Author: Tim

I like traffic lights, but only when they're...

Gears of War

I am trying to decide whether to get the Star Wars Imperial Assault game. This is the one with the tactical miniatures combat, which sounds great since I think there is very little that can beat the look of painted figures moving around a map. Especially Star Wars figures.

The problem is that it is only really for two players. You have hands of hidden cards and there is an element of surprise in the game play. I am hoping FFG will make a co-operative add-on for it (they already have three co-op adventures for Descent, which is their Fantasy game with very similar rules) and there are a few sets of solo-play rules that fans have created, but I am unsure.

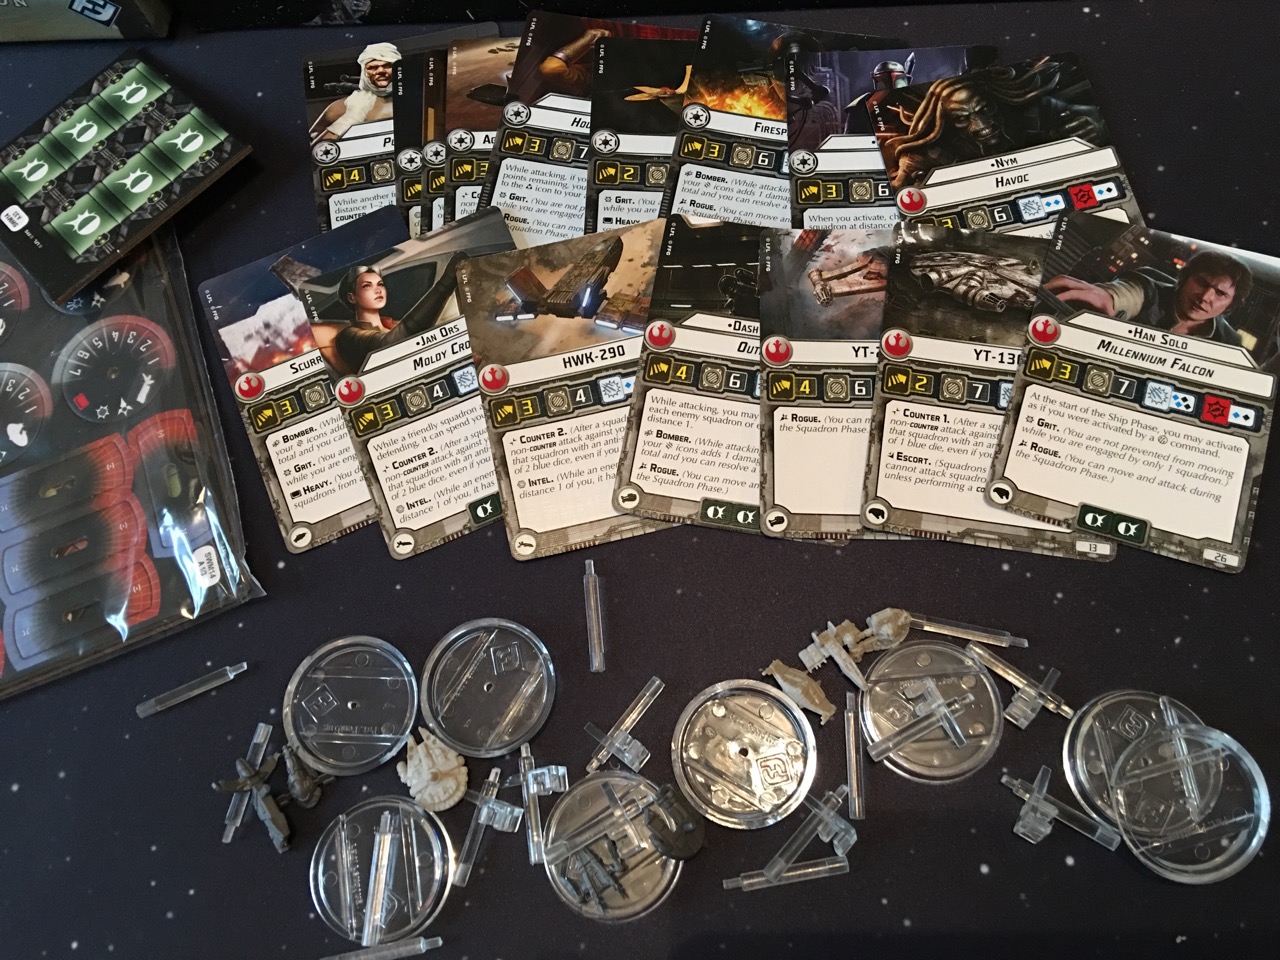
In the mean time, I thought I would give the Gears of War game a go. This isn’t Star Wars, but it is a sci-fi miniatures game and it is all co-op with a clever deck of cards for the enemies that gives them very sensible and unpredictable moves and attacks.

I also took the opportunity to sort out the Gears of War components properly. More sorting, yay!

IMG_0390.jpg

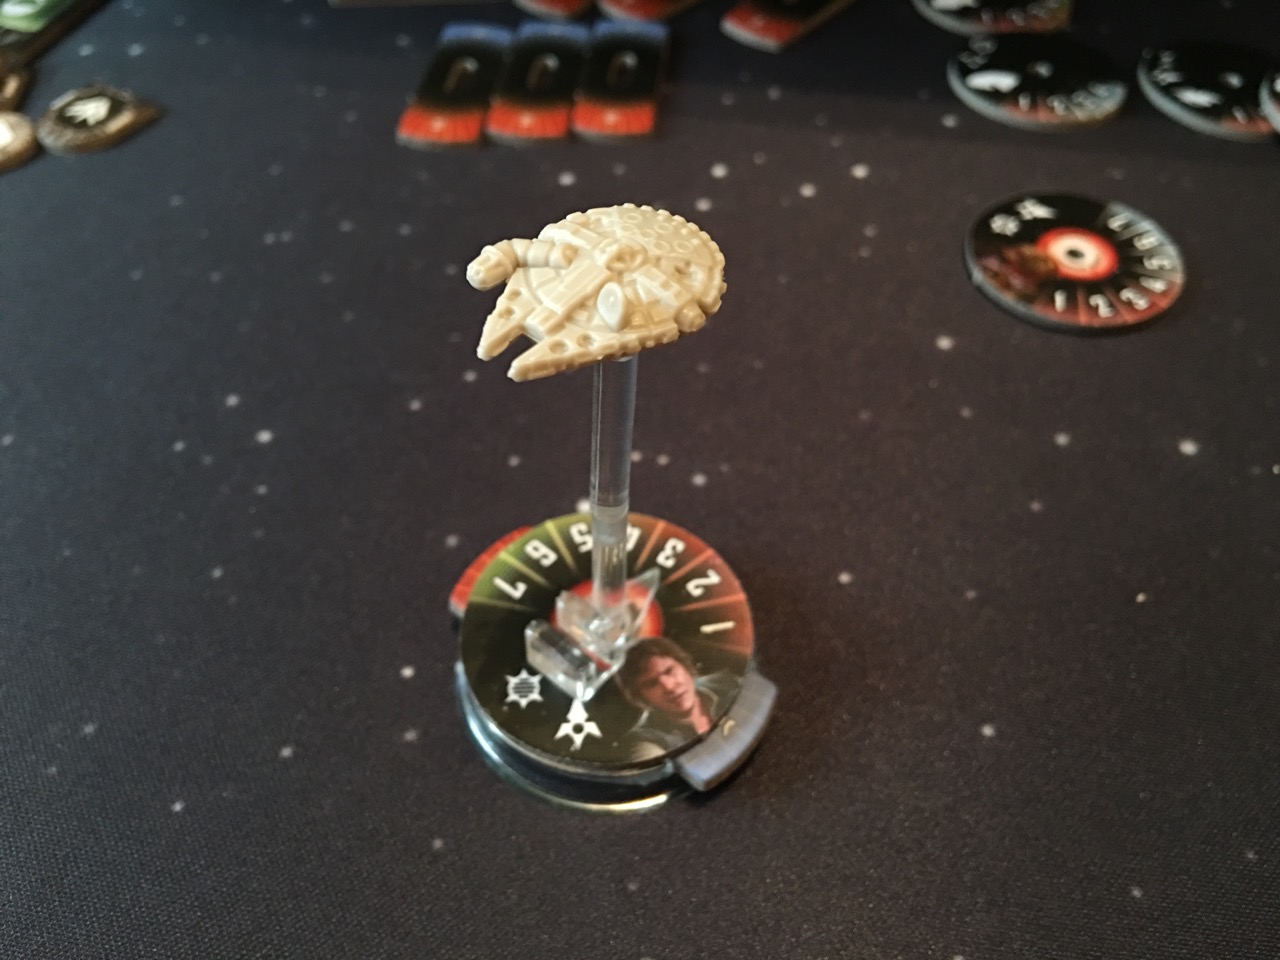
I put each type of enemy Locust figure in it own bag along with its wound tokens. They were all rattling around in the box before. I am proud of the paint jobs I did on these so this will help protect them too.

It has been a while since I played this, so I started with the first mission which is simple and quick, taking place on only one map level.

IMG_0392.jpg

Emergence mission. The COGs start at the left and have to destroy the emergence hole (red dot) at far right. Enemy locusts will keep coming out of that hole until they do this. The question marks are places to pick up extra weapons and ammo.

This was also an opportunity to try out my note taking using my new Adonit Jotscript stylus and penultimate on my iPad. I normally take my notes in a moleskine with a tiny-nibbed pen. The penultimate pages sync up to Evernote as images, which are then OCR’d and I can then search in them.

Here is an example of some of my notes from this game. I have searched Evernote for the word ‘boomer’ which is one of the enemy types. It is pretty good at matching my hand-writing, and the handwriting is pretty good for a stylus.

Screen Shot 2016-03-07 at 12.57.41.png

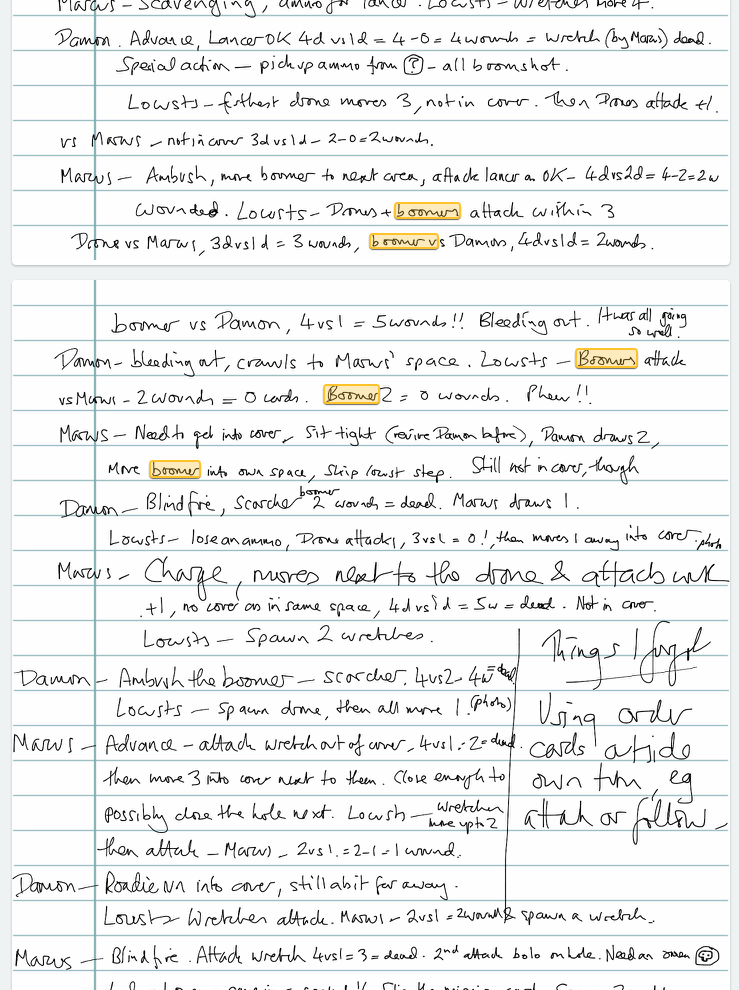
The main reason I keep notes is so if I get interrupted mid-turn I can pick up where I left off. They also help for blogs.

The humans are called COG soldiers which stands for Coalition of Ordered Governments.

At the start of the game, the two COGs Marcus and Damon team up and use an ambush to take out the two large boomer locust enemies. These are the most dangerous, being armed with shotguns.

Damon also picks up the weapon cache in his space, which is a choice of a Boomshot shotgun (as used by the enemy Boomers), or a Scorcher flamesthrower. He takes the Scorcher because this doesn’t require ammo to fire.

IMG_0395.jpg

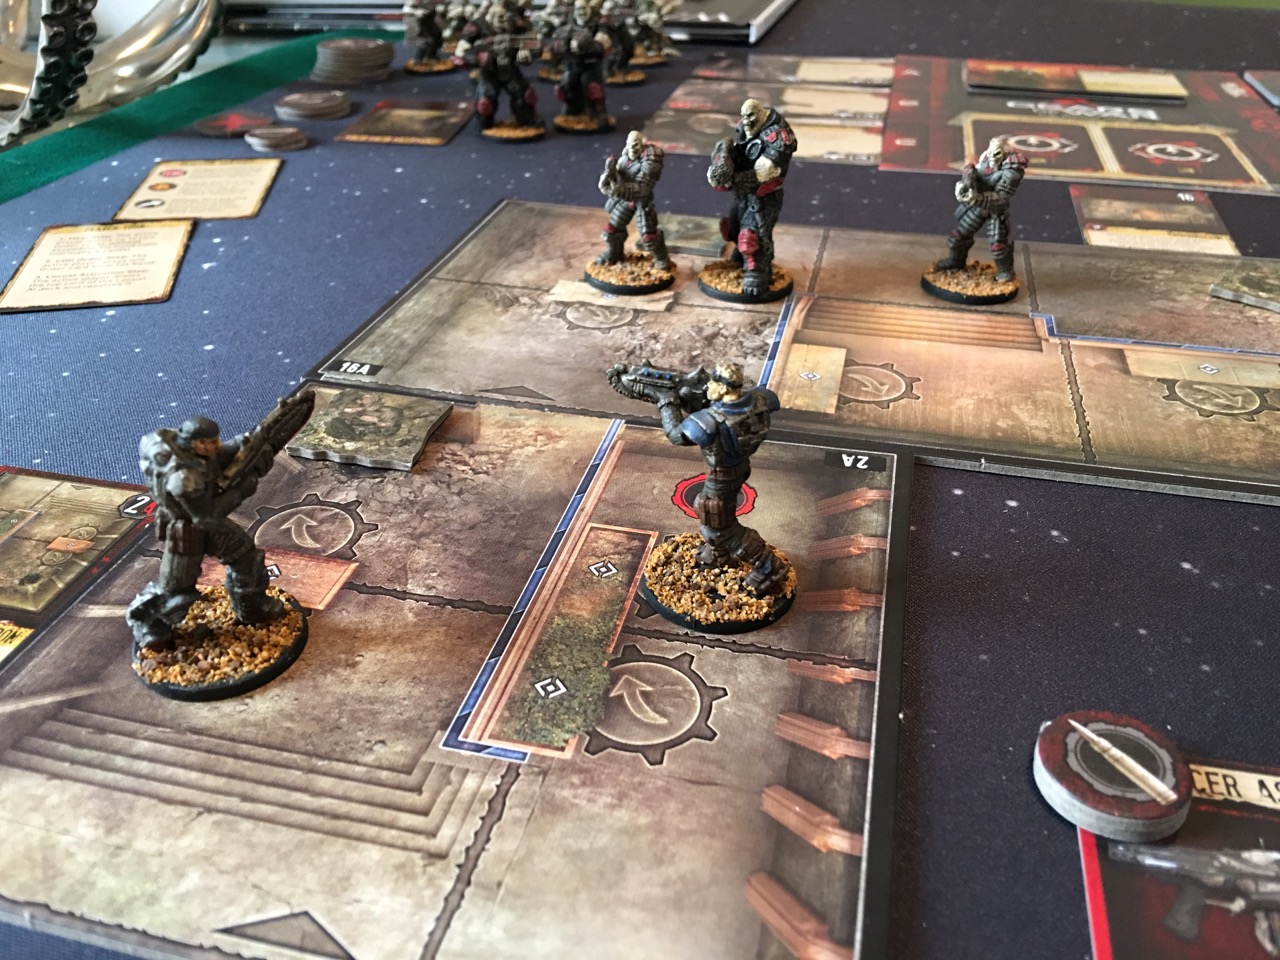
The first Boomer is dead, and the second has been lured into line of sight from the right end of the map by an ambush. Damon kills it, but this still leaves two Drones and then a third Boomer appears at the map exit.

It is a good start, but it is a hard slog to get past the drones, with both COGs taking wounds. More locust reinforcements appear from the far end of the map while Marcus and Damon pick up weapons and ammo (weapons you find tend to be more powerful than the ones you start with, and more ammo is always good).

IMG_0397.jpg

Send three and fourpence, we are going to a dance.

The COGs and Locusts meet in the middle of the back stretch. The Wretch is killed before it can get its claws into Marcus, but Damon takes a Boomshot to the face for a massive 5 damage. He collapses and is ‘bleeding out’. This is a rather revolting technical term. He is not out of the game, if he can crawl over to Marcus then Marcus can revive him.

IMG_0399.jpg

You lose one card from your hand per wound. Even if you have zero cards you are still fine unless you take more wounds. Damon’s hand was wiped out, and more, by the Boomer’s huge attack.

The locusts ignore any crawling COGs, so they all aim at Marcus now. Two attacks from the Boomers leave Marcus at zero cards, but at least he is still standing! The game is lost if both COGs are bleeding out because there is no one left to do the reviving.

Marcus uses a Sit Tight order to buy time to revive Damon and skip the locusts’ turn.

Damon then Blind Fires to take out one of the Boomers, Marcus charges to kill the Drone, and then Damon ambushes the other Boomer to kill it. They hack their way towards the final tile past more Wretches and Boomers that appear from the emergence hole.

IMG_0401.jpg

There is a constant supply of enemies to shoot

Finally, Marcus gets to within 2 spaces of the emergence hole and lobs a grenade it it. Kaboom! He rolls 4 dice and gets 1 omen result (the skull). This means the hole is sealed. No more locusts can appear from it. He also manages to take out a Wretch standing next to it.

This is the trigger to move to the last stage of the game, which is to mop up all remaining enemies.

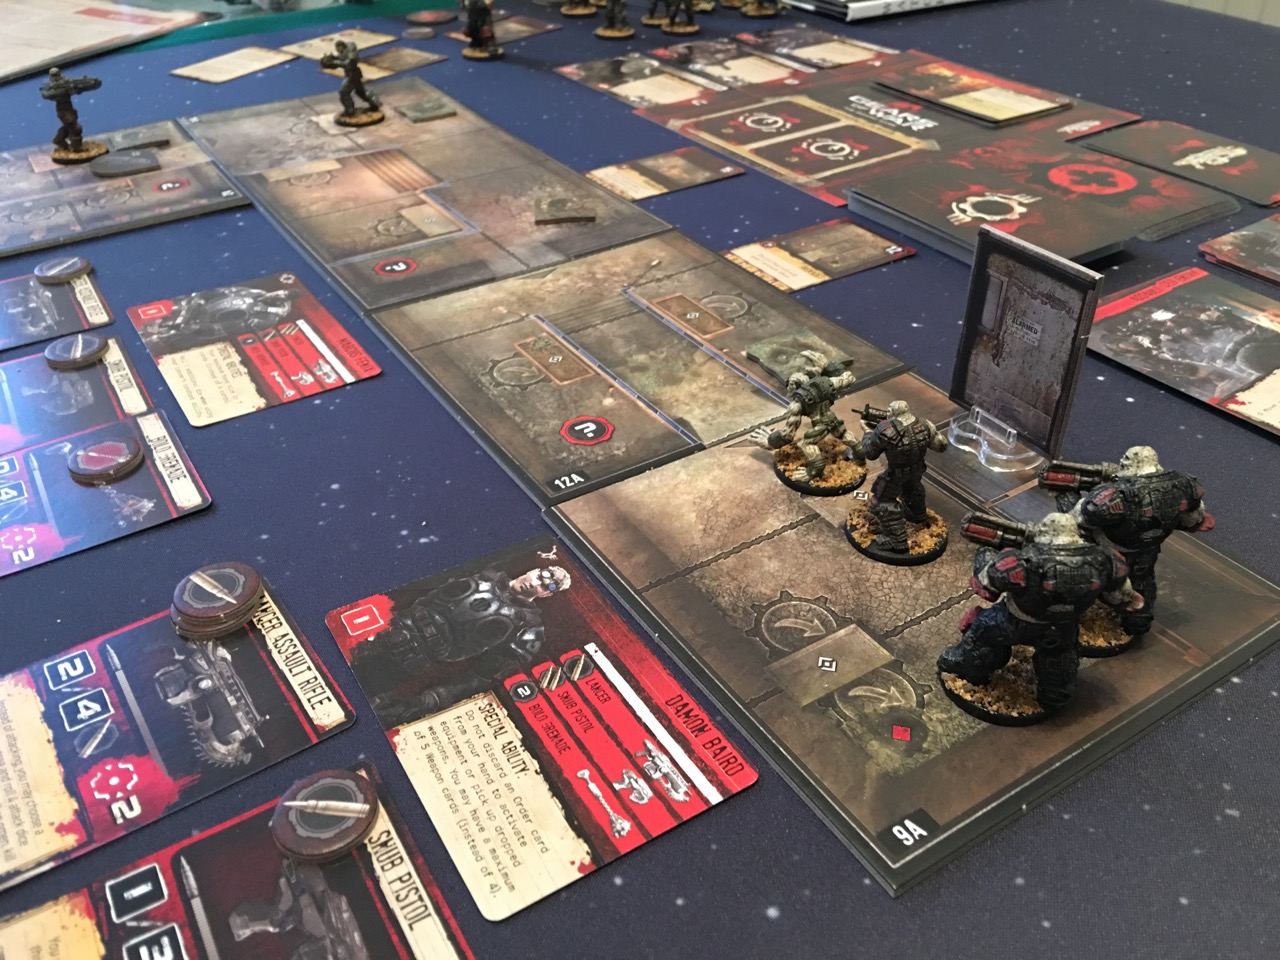
Unfortunately as they blow up the hole, a bunch of locusts bust through the exit door. Now all they have to do is kill these last six enemies. Marcus is suddenly surrounded by clawing Wretches.

IMG_0402.jpg

Hiding behind a small wall is no help against claws and teeth.

Luckily, the Wretches don’t attack this turn. Instead the two Boomers come round the corner and open fire on Marcus.

At this point I remember a rule I forgot. This is pretty much a record for me, waiting until the game is nearly over before remembering something.

The rule I remembered is that you can use some order cards during the Locusts’ turn to react and shoot (it is called ‘guarding’).

So Damon shoots and kills one of the Boomers. He used his picked-up Boomshot shotgun and its special effect when he rolled an omen skull is to wound other figures in the same space, so he wounds the other Boomer!

This is great but not quite good enough. The wounded Boomer still gets its shot off and Marcus falls over, but the Boomer’s scatter succeeds in wounding all the other enemies in Marcus’s space!!

Futuristic buckshot is flying everywhere.

IMG_0405.jpg

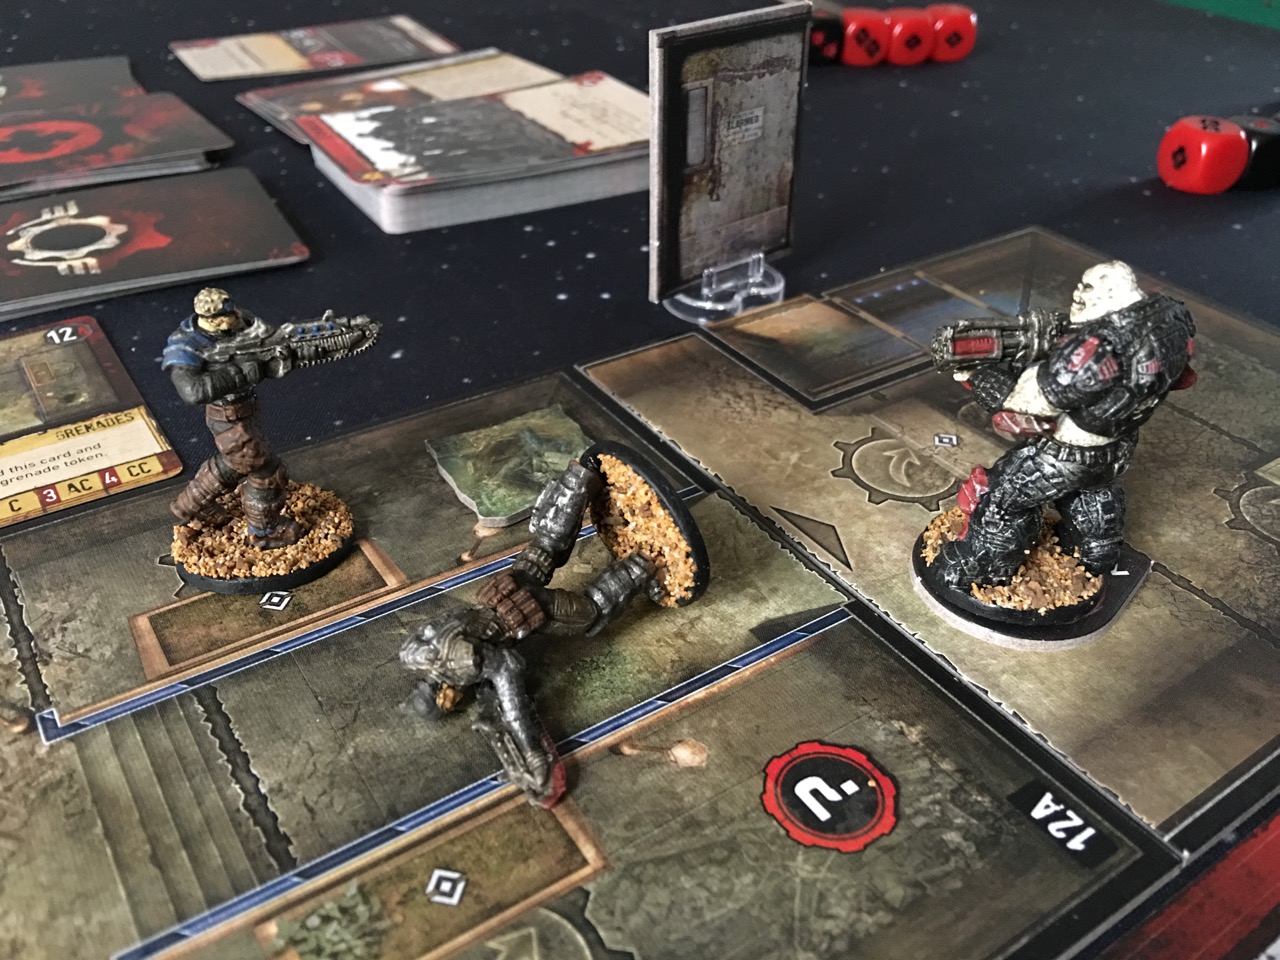
The Locusts have tokens under them to indicate they are wounded and how many more wounds it will take to kill them.

It is now Marcus’ turn to crawl back towards his team mate. As he does, the Drone takes the opportunity to fire on Damon in the next room.

Now that I have remembered the guarding rule, I make the most of it. Damon guards again and shoots the Drone before he can attack. He uses the Boomshot again, rolls an omen skull again, and so wounds both the Drone and the two Wretches in the same space. All three are killed as all have only 1 wound left.

This only leaves the Boomer, which advances two spaces and does not fire this turn.

IMG_0409.jpg

Only the Boomer remains. It follows Marcus as he crawls back towards Damon.

Not firing is the Boomer’s downfall. Damon unloads his last boomshot shell and kills it, winning the game!

Sorting!

IMG_0386.jpg

Part way through the sorting.

I went through all the cards and tokens from all the Eldritch Horror expansions and split them out. I shuffled all the location encounter cards into their decks. They can all stay as they are no matter what boards I am playing.

All the standard Ancient Ones get their cards stored together. The two Ancient Ones specific to the Antarctic and Egypt are gathered with the location encounter cards for those boards.  There are also some adventure cards that go with the boards (e.g. the Museum Heist from Egypt), so these go with them.

I decided to keep all the preludes in one deck, even though there is a specific prelude for each of the two boards. I think the mechanism is that at the beginning of setup you draw a random prelude card and if it is the one for a add-on board then you use that board. (You can also pick an Ancient One if you want to use a particular board).

The gate tokens for the add-on locations go in the add-on piles.

All the smaller cards, items, artifacts, relics, spells, etc are shuffled into their decks. These all go in the main box.

IMG_0388.jpg

Sorting all done. Everything goes in the main box apart from the two piles of bits for each add-on board (in the middle). These go in the appropriate boxes, along with their boards and rulebooks.

It all didn’t take too long, and also gave me a opportunity to review the rules for some of the newer mechanics (such as preludes and adventures). I had to understand them to decide where the cards belong.

Now, hopefully, when I come the play next it will be simple to find everything and setup and should save a lot of time.

I looked out the figures for Under the Pyramids

I bought the full set of pre-painted Arkham Horror investigator miniatures back when they came out. It is great because FFG are using the same investigators in all their Cthulhu games (they call it the ‘Arkham Horror Files Universe’). You can use the figures in Arkham Horror, Mansions of Madness, Elder Sign and Eldritch Horror.

IMG_0380.jpg

The new investigators in the Pyramids

I keep all the figures in a couple of plastic containers normally used for screws and things, and had taken out the Eldritch Horror investigators to keep with the game since this is the game I play the most and I wanted to keep them handy.

Now, with this second larger expansion, most of the investigators are available to be played in Eldritch Horror, so I am putting them all back in the plastic boxes and will keep these boxes near the Eldritch Horror box.

IMG_0382.jpg

Putting all the investigator figures back into my containers. There are just enough compartments for all of them.

I used to be able to cram all the boards, cards and bits for the first three expansions into the original box, but that won’t be possible with the new expansion added in.

IMG_0385.jpg

I took out the cardboard insert and could get the main board, the antarctic board and all the bits in one box. The new stuff won’t fit.

I think I may split out the cards that are specific to the adventures keyed to the Antarctic and Pyramids boards and keep those with the boards and rules in their respective boxes.

You can’t use both add-on boards in one game (unlike Arkham Horror where each town could be added on to the next and all be reached by train), so I will only be using one or the other.

I will keep all the extra cards for the base decks shuffled into those decks and store those in the main box. That way I can play the base game with all the variety of the add-on encounters and items, and if I want to play with one of the two other maps I can get all the bits for that map from its own box.

Sounds like a fun sorting project. Boardgamers love sorting stuff.

More tiny spaceships

I didn’t get any extra ships to go with my core set, but I did get the ‘Rogues and Villains’ expansion which is a bunch of extra little squadron ships, including the Millenium Falcon!

IMG_0327.jpg

These work the same as the X-Wing and TIE Fighter squadrons, except each is a single ship. They are all famous ships from the Star Wars expanded universe, and they all also appear in the X-Wing game (in larger models).

You can have Han Solo as the pilot of the Falcon, and also Boba Fett as the pilot of Slave 1.

IMG_0331.jpg

These are the bits that make up a squadron ship


These little ships are not painted, so I think this will be fun to do. I still have to paint the X-Wings and TIE Fighters from the core set.

IMG_0332.jpg

Here is the Garbage all put together, with Han on the base as the pilot. 

Each ship has two versions, one with the plain ship itself and one with its famous pilot. As with all ships, each version has its own cost. The piloted version has better abilities, but costs more to add to your fleet.

These new rogue and villain ships each pack a bit more of a punch than the original core set fighter squadrons, and have new special abilities which make them more effective when going up against the huge capital ships.

IMG_0334.jpg

These are the other ships. Boba Fett’s Slave 1 is at the bottom in dark grey. Far right is the Moldy Crow, Kyle Katarn’s ship from the Dark Forces and Jedi Knight video games.

I like the idea of having a variety of support squadrons to play with, rather than building larger fleets with more capital ships.

I can play the starter missions from the core set, but I now have more customizability of my fleets with different squadrons to try out.


Death on the Nile

We have the new big box expansion for Eldritch Horror, Under the Pyramids, which is set in Egypt!

IMG_0317.jpg

The box contents. Lots of lovely bits and pieces.

This is like the Antarctic expansion, it has a new map, new ancient ones, new investigators and loads of new cards.

The add-on map covers the whole of Egypt, with locations for Cairo, Alexandria, the bent pyramid, the Sahara, the Nile, etc. We have actually been to all these places. They are also some of the key settings in the classic Call of Cthulhu RPG adventure ‘Masks of Nyarlathotep’. I should re-read that adventure to get in the mood.

IMG_0319.jpg

The expansion board. What is neat is, unlike Antarctica, these locations are much more accessible. They can be reached from several locations on the main board.

Because Egypt is obviously smaller in scale, the locations here are all considered ‘local’ so you can move around without spending an action. I would imagine this would make Egyptian adventures much more frantic.

Just as important as the new board, we also get ten more investigators.

Eldritch Horror has been sort of counting backwards in investigators compared to those in the original Arkham Horror, starting with the investigators from the later Arkham expansions, and now Eldritch is giving us some of our classic favourites from the first game.

Returning to help defeat the forces of the outer void are the private eye Joe Diamond, the professor Harvey Walters, the archaeologist Monterey Jack, the nun Sister Mary, and our all-time favourite Mandy ‘Reroll’ Thompson. Disappointingly, Mandy does not have a reroll in this incarnation. Boo.

IMG_0324.jpg

Some old favourites with new art

You can add lots of new cards into the various decks to add variety to the game, but you only use this new board if you are playing with the evil pharaoh Nephron-Ka and the specific Egypt setup. This means that all the Egypt mysteries and adventures are built around and tie into the new locations.

This expansion also has a special multi-part Egyptian side adventure the investigators can follow to get special rewards. This involves helping one of the new allies, Erich Weiss, who has been framed for a museum theft. Erich Weiss is better known as Houdini.

You may not know that H.P. Lovecraft actually ghost-wrote a horror story for Houdini. This was the great ‘Imprisoned with the Pharaohs’, which has Houdini being kidnapped by Egyptian cultists and having to escape from the pyramid catacombs while unspeakable monsters carry out unspeakable rites.

Houdini was a big fan of Lovecraft. He enjoyed the story and went on to commission lots of other writing such as articles criticising astrology and other superstitions.

‘Imprisoned with the Pharaohs’ was also published the title ‘Entombed with the Pharaohs’, but the original working title was ‘Under the Pyramids’!

Star Wars Armada. Big ships flying slowly.

I managed to get a core set of Star Wars Armada at a discount. I wasn’t going to get this game because it seemed to me to be a whole level more expensive than X-Wing miniatures, both in terms of the base set and also the add-on ships. They are all bigger so it isn’t bad value, but I couldn’t see me spending too much on it. I got it at 40% off so I am pretty happy about that.

This isn't all the bits. There are loads of tokens and cards and stuff.

This isn’t all the bits. There are loads of tokens and cards and stuff. (The star field play mat does not come with the game, that is the mat I got for X-Wing).

You get three ships in the core set, along with all the bits and pieces you need to play.

The ships are the big triangular Imperial Destroyer (like the one that flies over your head at the start of the first film), and two smaller rebel ships.

These ships are gorgeously detailed, and are pretty much good enough to be stuck on a shelf as ornaments.

IMG_0282

For game pieces they are absolutely huge. This is the Destroyer:

Every picture is better with some Tim in it.

Every picture is better with some Tim in it.

In this next picture you can see more of the details in the bridge of the destroyer, and the gun batteries down the sides:

IMG_0296

The ships fit into stands which contain all the numbers for how powerful and tough each ship is. There are clever little dials on the sides of the bases for keeping track of the ship’s shields.

The two rebel ships on their bases. Ships can fire in all directions, so they have four firing arcs.

The two rebel ships on their bases. Ships can fire in all directions so they have four firing arcs.

In general this game is exactly the same as X-Wing, just on a different scale. The ships move around on a play area using a movement template, fire on other ships using dice rolls, and are customised using sets of cards with special abilities.

You also get a whole bunch of squadrons, X-Wings and TIE Fighters. These fly around the big ships and aren’t terribly powerful, but can support your attacks.

These aren't on the same scale as the big ships. If they were you wouldn't be able to see them. There is an apology in the rule book for these being bigger than the true scale.

Some of the squadrons. These aren’t on the same scale as the big ships. If they were you wouldn’t be able to see them. There is even an apology in the rule book for these being bigger than their true scale. Game nerds can be very pedantic.

With all the bits of card to be clipped into bases and stands and models and dials and stuff, it took ages to put everything together.

Ship cards and the movement template. There is only one template, unlike the many in X-Wing, but it is a bit more complicated.

Ship cards and the movement template. There is only one template, unlike the many in X-Wing, but it is a bit more complicated.

The movement is done just like in X-Wing. You use the template to position your ship.

What is neat about the Armada template is that these huge ships are not very manoeuvrable, but they can drift to the side as well as moving forwards. The template can be bent according to how manoeuvrable the ship is and how fast it is going.

You stick the template by your ship and then move the ship along the template to its end position.

The template is placed by the front of the ship base.

At the start of a move, the template is placed by the front of the ship base.


Then you move the ship to its new position along the template.

Then you move the ship to its new position along the template. It has both moved forward, shifted to the side and turned a little.

Unlike X-Wing, you don’t declare your moves in advance but you do have to declare the commands of your crew in advance.

These commands are things like repairing the ship, or directing your support squadrons. You use a stack of command dials to set your commands in advance.

The command dials. You set the dial you your chosen command, then put it on the bottom of the stack. Each turn you do the command on the top of the stack.

The command dials. You set the dial to your chosen command, then put it on the bottom of the stack. Each turn you carry out the command on the top of the stack.

Attacks are done with a special set of coloured dice. These are different from the ones in X-Wing, but have the same sort of icons for hits and criticals and other effects.

IMG_0290

The attack dice. There are no defence dice. You can’t dodge in a star destroyer.

Like in X-Wing the ships come with basic stats, and options for customising them. You can spend points to assign upgrade cards with special abilities.

Upgrade cards include

Upgrade cards include weapons, crew and abilities.

One thing about Armada that sets it apart from X-Wing in terms of gameplay is that a game only lasts six turns, and there is a specific objective to complete to score points to win. You can also usually win by destroying all the opponent’s ships, but you don’t have to.

The objectives come in a set of cards, and there are rules for determining which objective is used from those chosen by the players.

The objective cards. Most of these have rules for how to score points in the game. There are a variety of different types including 'capture the flag' kind of games.

The objective cards. Most of these have rules for how to score points in the game. There are a variety of different types including ‘capture the flag’ kind of games.

You can play a game with the three ships in the core set on a 36 inch by 36 inch playing area. This is the X-Wing play area size, and I have a mat for this.

For a full game with a larger number of ships you are supposed to play on an area of 36 inches by 72 inches! I think this is bigger than our dining table, so I won’t worry about getting too many ships. It will just not be feasible. A smaller game sounds fun and quick, though. I will see what it is like.

Dark Forces

I don’t know if anyone remembers the old Star Wars Dark Forces and Jedi Knight computer games, but they have included Kyle Katarn’s ship in the X-Wing miniatures game.

His ship was the Moldy Crow, piloted by his partner Jan Ors.

He didn’t do much flying in it. Jan would pick him up and drop him off between missions while he ran around shooting stormtroopers or chopping at Sith.

(more…)

Han vs the Bounty Hunters

Time to see how the Millennium Falcon flies.

I set up a battle between Han Solo and bunch of Scum & Villainy ships as a change from fighting Imperials.

The Millennium Falcon is great because not only does it have a turret, allowing it to fire in all directions, but this is its primary weapon, which means it can get all the bonuses that regular primary weapons can get, such as an extra die for close range.

This makes getting close to the Falcon extremely dangerous.

(more…)